Before you can fully use Nines, you'll need to add at least one property. Properties are the foundation of the platform and help organize everything you manage, from tasks and maintenance logs to assets, staff, and vendors. Without a property, you'll be unable to use many of Nines' core features.
There are two ways to create your first property: use the guided setup (Option 1) to add residents, staff, zones, and assets as you create the property, or use the quick setup (Option 2) to simply create the property now and add everything else later.
Option 1: Guided Setup (Recommended)
Nines provides a guided setup process that helps you quickly build out a property's structure.
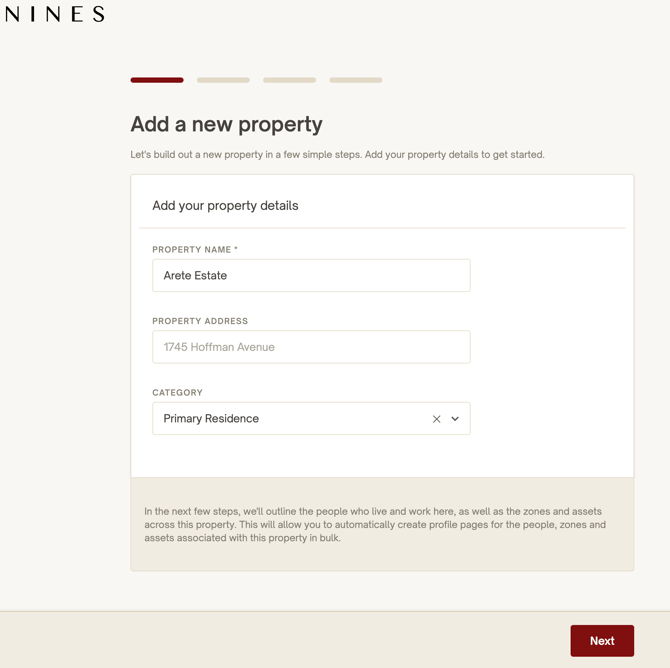
Step 1: Add Property Details
Navigate to Properties and click Add Property.
Enter:
- Property Name (required)
- Property Address (optional)
- Property Category (e.g. Primary Residence, Vacation Home, Rental Property)
Click Next.
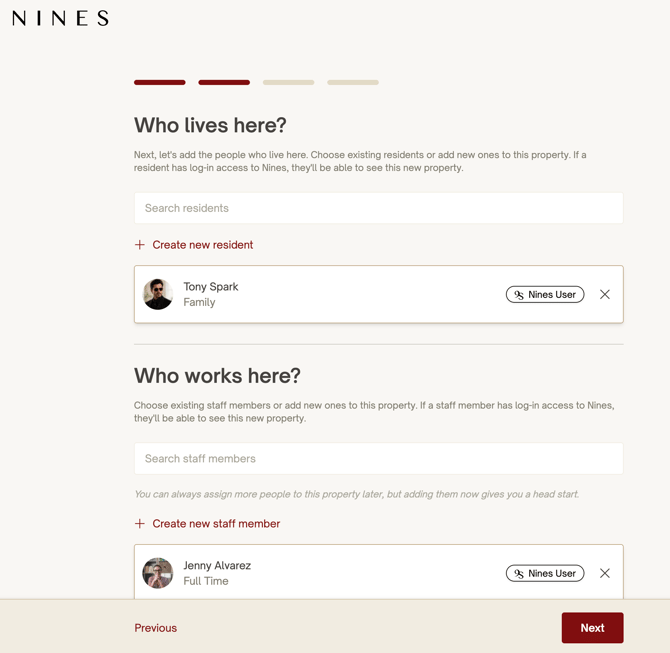
Step 2: Add Residents and Staff
Select the people who live and work at the property.
You can:
- Create and invite new residents
- Create and invite new staff members
- Search and add existing residents and staff members
If users already have Nines accounts, they can immediately be associated with the property.
Click Next.
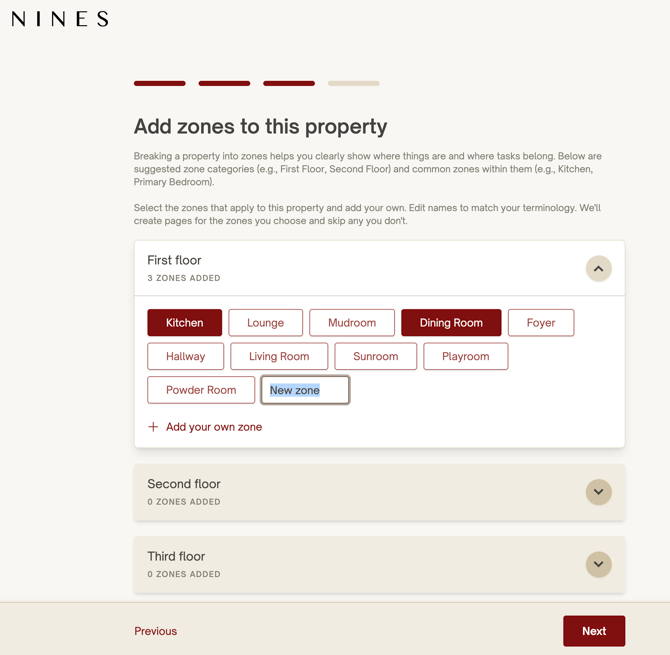
Step 3: Add Zones
Zones help organize the property into logical areas. Zones are organized into Zone Categories. A Zone Category is a broader grouping, such as First Floor, Second Floor, Basement, or Exterior, while the individual Zones are the specific areas within those categories, such as Kitchen, Dining Room, Primary Bedroom, or Garage. Nines provides suggested Zone Categories and common Zones within each, but you can add both to match the terminology and layout of your property.
Examples include:
- First Floor
- Kitchen
- Dining Room
- Living Room
- Second Floor
- Basement
- Garage
- Exterior
Nines provides suggested zones, but you can:
- Select only the zones you need
- Rename zones to match your terminology
- Add custom zone categories and/or zones
Click Next.
Step 4: Add Assets
Within each zone, Nines suggests common assets that may exist in that area.
For example, a Kitchen might include:
- Refrigerator
- Dishwasher
- Microwave
- Coffee Machine
- Stove
You can:
- Select suggested assets
- Rename assets
- Create custom assets
- Skip assets you don't need
When finished, click Save.
Nines will automatically create the selected zones and assets for you.

Tip: You can pause the property creation process at any time. Click the X icon in the top-right corner to exit and return later—all information entered so far will be automatically saved. You can also click the Eye icon to preview a summary of the property, residents, staff, zones, and assets you've added. If you'd like to start over completely, click the Reset (arrow) icon to clear all information and restart the setup process.
Option 2: Quick Setup
If you don't want to complete the guided setup right away, you can simply:
- Create a property.
- Enter a Property Name.
- Click Next three times and complete the creation process.
You can always add Residents, Staff, Zones and Assets later. This is often the fastest way to get started if you want to begin using Nines immediately.
Why Zones and Assets Matter
While optional during setup, adding zones and assets makes Nines significantly more powerful.
They allow you to:
- Assign maintenance tasks to specific locations
- Track asset information and warranties
- Store manuals and documentation
- Keep maintenance history organized
- Generate better reports and records over time
For example:
Property → First Floor → Kitchen → Refrigerator
This structure makes it easy to understand where work occurred and maintain a complete history of your property.
Next Steps
After creating your first property, consider:
- Recording important property information and documents.
- Adding key vendors and service providers.
- Creating recurring maintenance tasks.
- Logging what has been done recently in a zone or for an asset
- Building out additional zones and assets as needed.
Remember, every task, log, asset, and operational record in Nines is connected to a property and potentially zone, making your first property the starting point for everything else you'll manage in the platform.